FutureRestore is a complex tool that is not for the faint of heart. You need to do a lot of prep work, manage a ton of files. And even then, the tool may not function properly.
Here’s the ultimate guide to restoring with FutureRestore that will help you perform restores like a pro within minutes.
Table of Contents
1. Prepare your iPhone, iPad, or iPod

- You can’t use FutureRestore iPhone X to iOS 12 anymore. If you do so, FaceID will break. All other devices, however, are good to use the –latest-sep and –latest-baseband command.
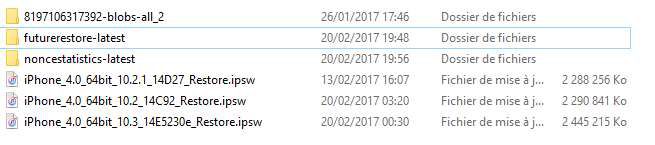
- Please place all SHSH Blobs, IPSW firmware files, and “manual” files (SEP, baseband and build manifest if you’re doing it this way), and FutureRestore into one folder on the desktop (recommended) or anywhere else on the computer.
- WiFi-only iPads, as well as iPod Touch devices, don’t have a baseband file. So, skip that step/command if you are doing it manually. Cellular iPads do have a baseband so please DO NOT use the –no-baseband command.
- Make sure you plug your device into your computer.
- Disable Find My iPhone/iPad to prepare your device for the restore. Uninstall the “Pls No Recovery” tweak
- Check this table to see which iOS version you can restore (upgrade or downgrade) to.
[jtrt_tables id=”17828″]
- If you are planning to restore your device using a backup, please run RootFS Restore before backing up on iOS 11. If you don’t, you will need to activate your device by using iDeviceActivation. If you want more devices added to the table above, drop a comment below.
Windows
- If you are using Windows, please make sure you do not have iTunes from the Microsoft Store installed. If you do, uninstall it and make sure you uninstall everything iTunes related in the Control Panel and then download the standalone program from the official Apple website.
- An iTunes pop up will occur when placing you or having FutureRestore place your device into recovery mode when it is connected to your computer. Please ignore this iTunes message. It is normal.
Apple TV
- If you are trying to FutureRestore an Apple TV, it’s basically the same process. Please check this link for more information.
2. Download the essential files
Step 1 Download s0uthwest’s fork of FutureRestore from here (Windows, Mac, and Linux). Remember, the Mac version only works on macOS 10.13.x (High Sierra) and above versions.
Step 2 Get your SHSH Blobs ready.
Step 3 If you used TSSSaver, get a blob from your noapnonce folder.
Step 4 If you don’t have a blob within the noapnonce folder, check to see if a blob outside of the folder has a generator of “0x1111111111111111” (there’s 16 of them). If so, use that blob.
Step 5 Download the IPSW of the version you want to FutureRestore to.
- For non-beta versions, use ipsw.me.
- For beta versions, use the iPhone Wiki.
Step 6 If you are manually specifying SEP/baseband, download the latest compatible IPSW. As of this writing, the latest version is iOS 12.2.
Step 7 If you are upgrading to iOS 12.1.2, please make sure to check which version of iOS 12.1.2 you have within your blobs.
Remember, if you look at the file name of the blob, it will say either “101” or “104” after iOS 12.1.2. Please download the corresponding iOS 12.1.2 IPSW file (the IPSW name will have 101 or 104 also) or else your restore will fail.
3. Set the Nonce
How to find your nonce
- Open you shsh2 file on your computer (this is from within the “noapnonce” folder)
- Use control+F (Windows) or command+F (Mac) and search for “generator”.
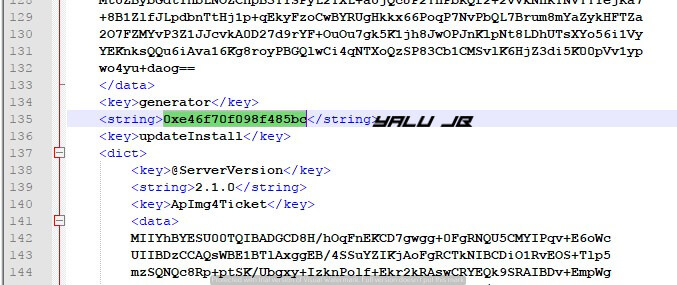
- Right next to or underneath the generator, there should be “<string>combination of letters and numbers</string>”
- Copy that combination of letters and numbers.
- Send it to your device (iMessage, Mail or whatever you can to send it there).
- If you don’t have a blob within the noapnonce folder but you have one outside of it. Please check for the following in the name of your blob. If you do have one of the below, then these are the corresponding nonces you need to set
A9 and below
- 603be133ff0bdfa0f83f21e74191cf6770ea43bb – 0xbd34a880be0b53f3
- 352dfad1713834f4f94c5ff3c3e5e99477347b95 – 0x9d0b5b5ff92fff23
- 42c88f5a7b75bc944c288a7215391dc9c73b6e9f – 0x4bb8834ba6444b50
- 0dc448240696866b0cc1b2ac3eca4ce22af11cb3 – 0x698337f5a79c3292
- 9804d99e85bbafd4bb1135a1044773b4df9f1ba3 – 0xedeeb72d7575e360
A10 and above
- 15400076bc4c35a7c8caefdcae5bda69c140a11bce870548f0862aac28c194cc = 0xbd34a880be0b53f3
- 833e50b9c6a4fbfbdc51144a60b4cf25be3a0a4742ca2b7bd6f5ec06905443ac = 0x9d0b5b5ff92fff23
- d8f682df87d812c372491b613d59795a80383f439587c0bb511ccf6865eb87cc = 0x4bb8834ba6444b50
Setting the nonce
Step 1 Open your jailbreak application (unc0ver, Electra, Meridian, Doubleh3lix, g0blin or others) and navigate to Settings.
Step 2 You can set nonce for iOS 10 by using Nonceset tweak by Julio Verne, add https://julioverne.github.io/ to your sources, install Nonceset, paste the generator from your blobs into the app.
Step 3 Find where it says boot nonce or just nonce.

Step 4 Paste into that field the combo of letters and numbers that you copied.
Step 5 Press jailbreak/set nonce.
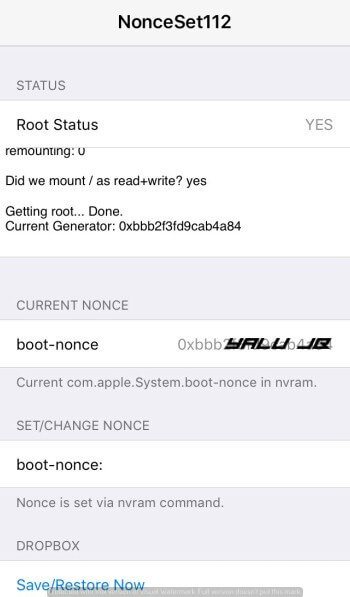
Step 6 Your nonce is now set.
Please proceed to the final part 4 and leave your device in jailbreak state/not rebooted or this guide will not work moving forward.
4. Perform the Restore
Warning – DO NOT reboot your device at any time during this process. Doing so can change your nonce. If a reboot occurs, you must re-jailbreak your device and set your nonce again.
Option 1 – Automatic SEP/Baseband
Step 1 Open command prompt (Windows) or terminal (Mac) and type –
<drag futurerestore in> -t <drag blob in> –latest-sep –latest-baseband <drag ipsw in>
Make sure to have spaces after the command when dragging in this file.
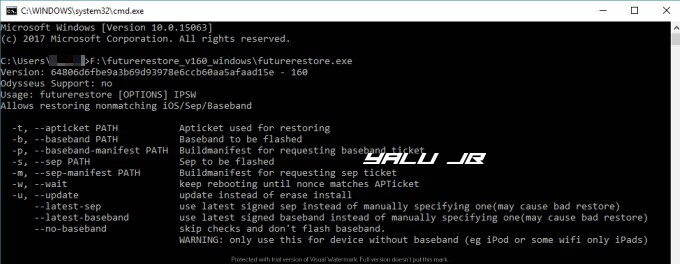
Step 2 (Optional) Don’t use the latest baseband command if you have an iPod or WiFi only iPad. Instead, use the following command –
–no-baseband
Here’s what a sample command should look like –
<drag futurerestore in> -t <drag blob in> –latest-sep –no-baseband <drag ipsw in>
Option 2 – Manually specify SEP and Baseband
Step 1 Extract the SEP, Baseband and build manifest files
Step 2 Copy the URL of the IPSW download and paste it into the form on www.extract.me (this IPSW file is different from the IPSW you are restoring to. This is the latest IPSW for your device. Right now it is 12.1.4)
Step 3 Download applicable sep (.im4p) firmware file and ice/Mav release file (baseband file ending with .bbfw) from the page extract.me generates.
Step 4 Use this table to see what files you need to download for your device. right now this is only for iPhones (currently outdated).
[jtrt_tables id=”17829″]
- GSM means carriers such as AT&T and T-Mobile.
- Global means carriers such as Verizon.
If you are not sure, please use the Telegram jailbreak bot.
If you would like more devices to be added to this list, just drop a comment below. Otherwise, you can also use the SEP/BB command with the Telegram jailbreak bot (/sepbb) for future use/other devices of this guide.
You can also find the version of the baseband for each iOS device/version here. The name of the “bbfw” file always contains the version number. The name of the SEP file always contains the “boardconfig” identifier of your device without the “AP” at the end.
For example, if you have a device with “d221ap” configuration, the name of the sep im4p will always contain “d221”.
Step 5 Download the build manifest file from the extract.me page as well. This can be found toward the bottom of the page.
Step 6 Place those files within your FutureRestore folder.
Step 7 Begin by opening the command prompt (Windows) window or terminal (Mac) and dragging in the FutureRestore.exe file.
Step 8 Type -t (leave a space after -t) and drag in your blob.
Step 9 Type -s (leave a space after -s) and drag in the sep file.
Step 10 Type -b (leave a space after -b) and then drag in baseband file. iPads (WiFi-only) and iPod touch users should use the “–no-baseband” command here. Not specifying a -b flag or “–no-baseband” will result in FutureRestore quitting.
Step 11 Type -p (leave a space after -p) and then drag in build manifest file.
Step 12 Type -m (leave a space after -m) and then drag in build manifest file again.
Step 13 (Optional) Type -d (leave a space after -d) this is for debug.
Step 14 Make sure there is a space after -m or -d and then drag your IPSW file into FutureRestore.
Here’s what an example command looks like –
futurerestore.exe -t (blob) -s (sep) -b (baseband) -p (buildmanifest) -m (buildmanifest) (ipsw)
Step 15 Press enter and wait for it to restore your device.
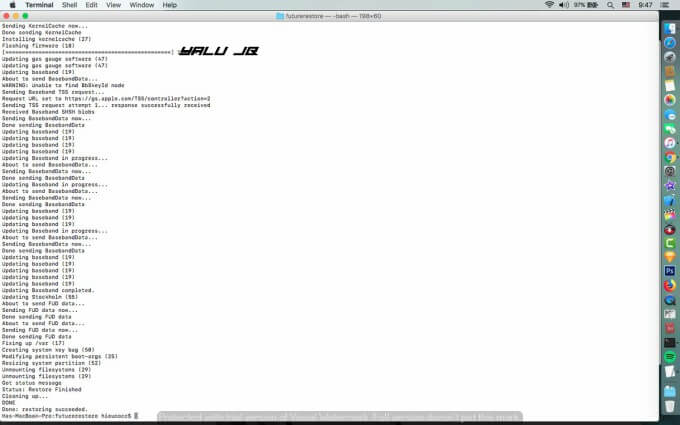
That’s it. No need to be afraid of the terminal.
Option 3 – Upgrade/Downgrade to incompatible iOS versions
If you have a compatible device and are trying to downgrade/upgrade from an incompatible iOS version (cannot be jailbroken), follow this guide.
This guide was written back in 2017 and is, therefore, slightly outdated. So, make sure you replace the firmware therein with your current version and the version you want to move to as and when required.
It only works for the iPhone 5S and the iPad Air (first and second generation). Any other device apart from these, especially the newer ones, are incompatible with this guide.
Video Tutorial
Just please use the right files if you’re going to follow this tutorial. The method remains the same. This is done on macOS but you can learn how to do the extract.me part here.
This is another good video. It is done using the Windows operating system and should be helpful for those who own a Windows computer.


![Phoenixpwn jailbreak updated for iOS 9.3.6 [DOWNLOAD]](https://cdn.yalujailbreak.net/wp-content/uploads/2017/08/phoenixpwn-1-211x150.jpg "Phoenixpwn jailbreak updated for iOS 9.3.6 [DOWNLOAD]")
Hi Gian. Thanks for the excellent tutorial !
I have accidentally upgraded my iPad Air (cellular) from iOS 12.4 to 12.4.3, and I wish to downgrade back to 12.4, in order to jailbreak with unCover or Chimera.
I have saved my iOS 12.4 blobs.
How do I proceed, especially with the setting of the nonce on my device, given that I am currently on 12.4.3 ?
I have iphone x on ios 11.4.1,
can i upgrade to 12.4 now, not sure if sep is compatible
thanks
Yes, you can. Check this video out – https://youtu.be/mt8rYUOP3pk
Hi.
I’ve an IPhone X and I’m on 12.4.
Is it possible downgrade to 11.4.1?
I’ve 11.4.1’s blobs
Thank you
No, it’s not possible to do so anymore.
can i upgrade iPhone XS Max 12.0 to 12.4 with shsh2 blobs ?
Yes, you can upgrade to iOS 12.4.
Can I use future-restore to upgrade my my Iphonex ios11.4 jailbreak to ios 12.2 cause Im confuse about the base-band compatibly
I have blobs for 12.2
Which device do you have?
iphone X ios 11.4 b3 jailbreak
Can i restore my iphone x on 12.3.1 to 12.1.2?
No, that’s not possible without a nonce setter.
Hi Gian thanks to your response.
I am trying to work around to pair my iwatch. I am currently 12.1.2 Jailbroken and saved all bloobs for 12.x, update it to current IOS, then pair my watch and then return back to 12.1.2
Is that possible? Any other way?
I can’t pair my watch as it needs to update my IOS to the current verion.
No, that’s not possible. If you want to pair your Apple Watch, you must upgrade.
Thanks Gian.
Lastly if i upgrade to latest verion of ios can i go back to 12.1.2 with my save bloobs and use the above?
No, that’s not possible since you require a nonce setter or a jailbreak to use FutureRestore.
Hi, Gian!
I just wanted to thank you for such a great tutorial!
Because reports are now coming in that the SEP for iOS 12.3 is not compatible with iOS 12.1.2, I figured I better move from 10.1.1 to 12.1.2 while 12.2 is still being signed!
I did the fully manual (SEP, baseband, and build manifest files) restore and it ran without any errors at all.
Now I have two weeks, or so, to decide how to deal with the 12.1.2/12.2 SEP passcode conflict. BioProtect is one consideration . . .
Blessings, and thank you!
Hello, Richard. Glad you got your device updated. I would suggest using BioProtect too. Hope this helps.
Hi Gian,
I have an iphone 6 on iOS 12.1.3 and have all my blobs (from 11.4.1 to 12.1.2) saved with TSS Saver.
Can I downgrade to iOS 11.4.1 or 12.1.2 with this method?
Tks for help.
No, downgrades are not possible on non-jailbroken versions.
how do you set nonce if you are on 12.2 without jailbreak? i am so lost.
You can’t do that right now. Setting nonce requires an exploit.
Hi, Gian and Andy!
After hours of research, I have found that restoring to 12.1.x with the 12.2 SEP is only good for fourteen days. After fourteen days it will bootloop all devices upon reboot. This has been proven repeatedly. The only known solution right now is to not use a passcode (and without a password you can’t use Apple Pay). From: https://www.reddit.com/r/jailbreak/comments/be4ixf/news_the_status_of_the_122_sepdont_use_it/
“To whom it may concern, 12.1.x is not fully compatible with 12.2 sep. It’ll reboot loop you after 14 days if you have a passcode. . . . ”
I encourage everyone to read the above page thoroughly.
Blessings!
Hi, Gian!
Blessings, and thank you SO MUCH for such a long-awaited tutorial!
Above, you state:
“Download s0uthwest’s fork of FutureRestore from here . . . ”
The link you provide is to your page at:
https://yalujailbreak.net/futurerestore-ios-11/
but it does not seem to have any link to s0uthwest’s 2019.2.22 (v231) fork of FutureRestore.
Perhaps a better link might be?:
https://github.com/s0uthwest/futurerestore/releases/download/231/futurerestore_v231_macOS.zip
Also at https://github.com/tihmstar/futurerestore/blob/master/README.md
tihmstar states:
–latest-sep use latest signed sep instead of manually specifying one (may cause bad restore)
–latest-baseband use latest signed baseband instead of manually specifying one (may cause bad restore)
Are you aware of any “bad restores” from using “–latest-sep” and “–latest-baseband” going from 10.1.1 to 12.1.2 on a 7+? (As you must know, posting to your site converts two hyphens to an mdash . . . )
Blessings, and thank you!!
Hello, Richard. As far as I know, the latest sep works pretty much every time. If you want peace of mind, you can do everything manually. Welcome!
hi, I have an iphone 7 on iOS 11.4.1 and have blob’s saved with TSSSaver for iOS 12.1. Can I use the commands –latest-sep and –latest-baseband (I want to make it as simple as possible)? If I want to make a backup before, what Software should I use and what is being backuped? You sad I have to run RootFSRestore before backing up on iOS 11, but RootFSRestore is included in unc0ver, so I must run unc0ver once more?
1. That depends whether or not the latest SEP is compatible with your device.
2. You have to back up your “user data”.
3. Yes, you need to run RootFS Restore using unc0ver.
Hi, Andy!
For the compatibility list for the latest signed iOS 12.2 SEPa, go to:
https://www.reddit.com/r/iOSDowngrade/comments/a77vhr/discussion_thread_ios_sep_secure_enclave/
It looks like 12.2 will work fine for your iPhone 7 and my 7 Plus!
(Do be sure to use two hyphens before the two uses of the word “latest”: –latest-sep –latest-baseband !)
UPDATE/ALERT!?
From the FutureRestore Guide at: https://docs.google.com/document/d/1WHuwuvnkcEUCwaDuck2dy-MR7q4em38uL4_4Utx2QZ8/edit
“ALL devices have an issue with SEP where restoring to 12.1.x with 12.2 SEP will cause your device to reboot on unlock after a week. We would strongly advise not using futurerestore at all until these issues are resolved. Basically your phone will stop functioning properly after two weeks.”
Gian, can we use the SEP and baseband from the 12.1.4 Restore if it is no longer being signed?
You can use iOS 12.2’s SEP. It is compatible with iOS 12.0-12.1.2.