Cloudflare has just launched new privacy-oriented DNS service. Here’s how you can install and use the 1.1.1.1 DNS address on your iPhone.
Table of Contents
What is DNS?
DNS stands for Domain Name System and it converts domain names such as google.com to its IP address equivalent.
For the uninitiated, the internet actually uses numeric IP addresses, not alphabetic domain names or addresses.

Your carrier also owns a set of DNS servers to ensure faster browsing. However, the default DNS may not be the best for your device if you value your privacy and might even degrade performance.
This is where custom DNS servers such as Quad9 come in. They provide better connectivity while ensuring privacy.
Why should you use Cloudflare’s 1.1.1.1 DNS service?
1.1.1.1 currently provides the best query speeds worldwide and is the best performer in the “Raw Performance” and “Uptime” sections.
It has a response time of 14.2 milliseconds whereas OpenDNS and Google have response times of 20.64 milliseconds and 34.51 milliseconds respectively.
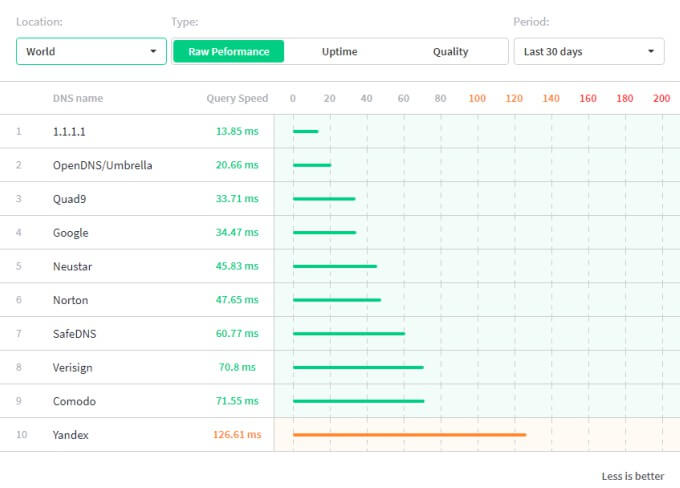
As far as quality goes, it is ranked at the 10th place. However, this might change in the future as the service is still in infancy.
Moreover, Cloudflare DNS servers will erase all browsing records after a period of 24 hours. This will ensure your browsing data and history remain private.
Cloudflare DNS server addresses
Cloudflare’s DNS servers are very easy to use and remember, perhaps even more so than Google’s DNS and OpenDNS. Here are the IP addresses for IPv4 networks –
- 1.1.1.1
- 1.0.0.1
As far as IPv6 networks go, you must use the following addresses –
- 2606: 4700: 4700 :: 1111
- 2606: 4700: 4700 :: 1001
While this may look daunting to change, most operating systems and devices come with dedicated sections for changing server addresses. This holds true for all Apple devices including the iPhone.
- Warning – Remember, some unscrupulous carriers such as Vodafone are deliberately blocking Cloudflare DNS servers. If that’s the case, try using 1.0.0.1 instead of 1.1.1.1. Fortunately, both the addresses work just fine on my carrier.
Adding 1.1.1.1 DNS to your iPhone, iPad, or iPod
Method 1 – Manually input DNS
Step 1 Open Settings.
Step 2 Go to the Wi-Fi section and tap on the network your device is currently using.
Step 3 Scroll down and tap Configure DNS.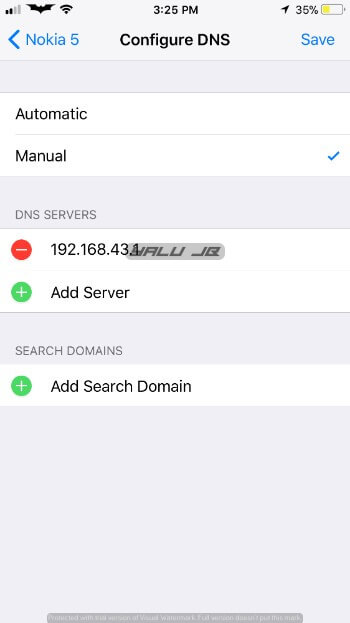
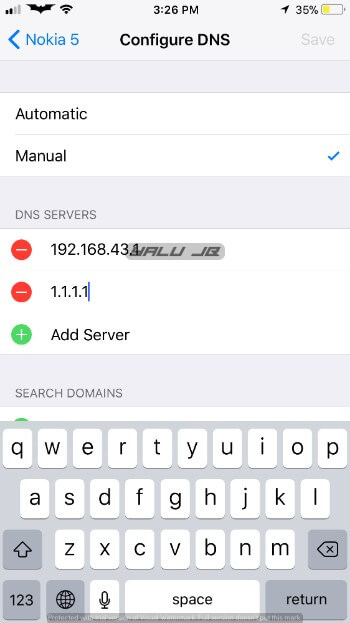
Step 4 Change the DNS option from Automatic to Manual. Tap “Add Server” and input “1.1.1.1” or “1.0.0.1” in the server field and press Save.
Step 5 Remove the older address. In my case, it was 192.168.43.1.
Method 2 – Change DNS via router
If the aforementioned method doesn’t work for you, you can change your DNS directly in your router.
Generally, router settings are accessible from your computer’s web browser from IP addresses like 192.168.1.1 or 192.168.0.1.
This change in DNS servers will affect all other devices that connect to your network, not just your Apple device.
What has your experience been like with this new DNS service? Lets us know in the comments below.


